In 2015 I created my Satele Shan cosplay. Satele is a Jedi of old from the Knights of the Old Republic games. I had a few pictures and screen shots from the game to work off of.

Image I kept on my phone for months.
I started with the fabric clothing. I borrowed a mannequin from the Long Beach Playhouse, got a large cheap piece of muslin, scissors and pins. This was my first time working on a mannequin and I fell in LOVE! So much easier than trying to pin it on myself. And a lot less pokes.

The pattern was not pretty. There were many sections pinned together and folded. But it was cut out to fit my body and to match the pieces I saw in the original picture.
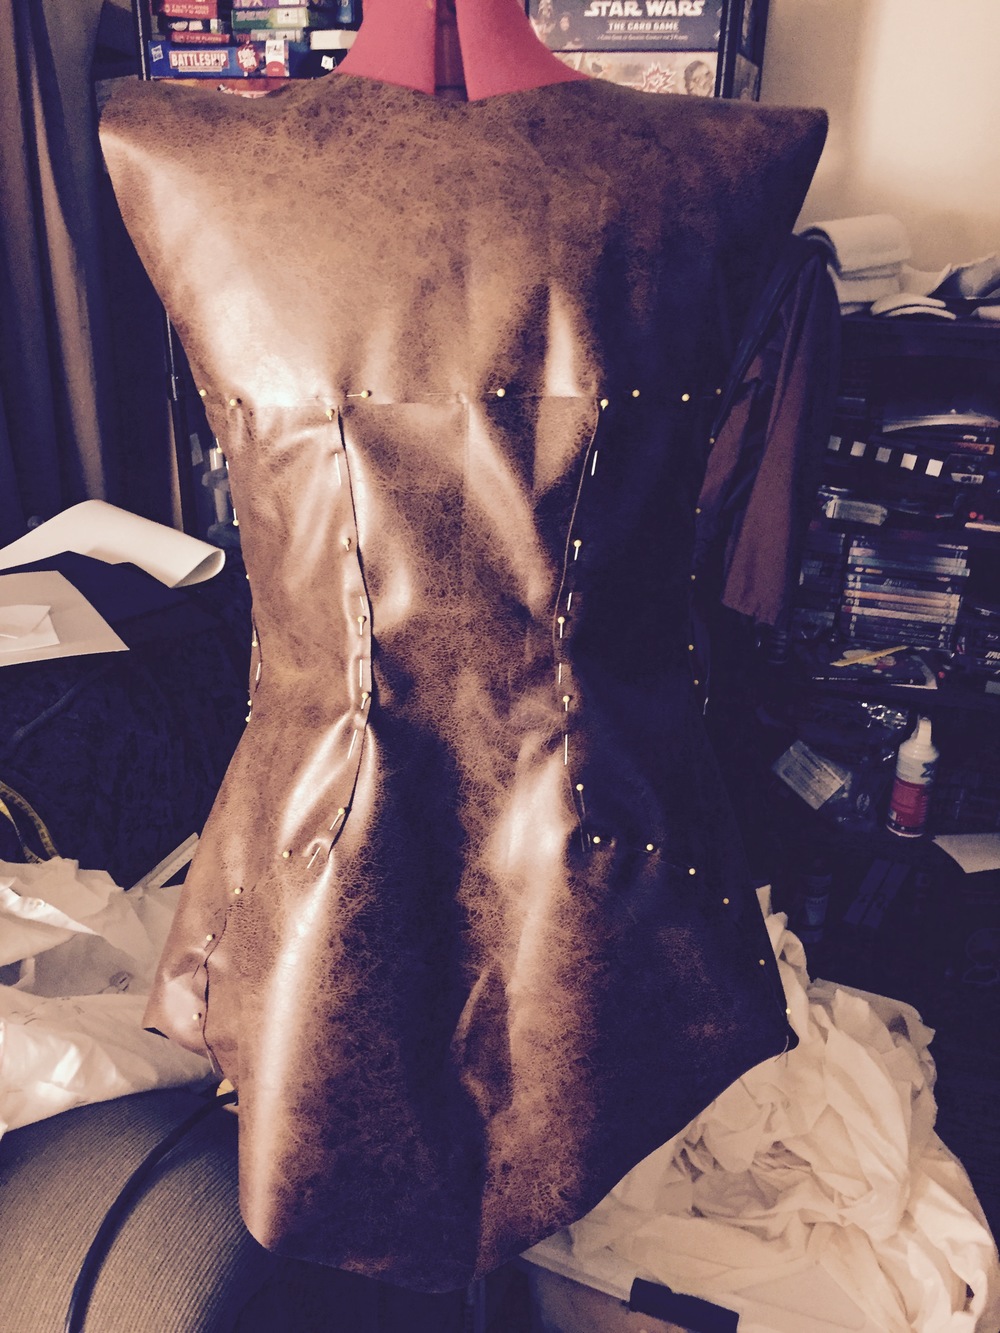
I bought fabric that matched as close as possible to the original picture, with out being custom made. I bought plenty extra just in case I messed up. I used my pattern to cut out the final fabric, then pinned it all together to make sure it still worked and hung right. This was my final chance to make it fit or lay any different. Notice the pieces overlay each other instead of the normal “front to front” sewing. This is required for the next step.

Satele’s outfit has yellow/gold lines around it. For this I used tri fold bias tape. Matching the color as best I could. The tricky part about the sewing was wrapping the bias tape around the edge of one piece, and over lay the first piece with the 2nd piece. That way I only needed one seam to hold it all together. This made it cleaner looking. I used the same color thread as the bias tape.

The white piece around the hip was created the same way as the other pieces. The bottom of the white is not sewn on to anything. This helped look like things were layered instead of all one piece. It also helped my legs move better. I did not take a good picture, but the front has a zipper that I built in, to make it easier to get on and off. There is a front piece that goes over my shoulders and down my front. That will hide the zipper.


The top neck pieces is a whole separate piece. I thought I was going to have to add support or stiffeners on the shoulders, but the fabric was stiff enough to hold shape on its own.
The right side of the front folds over the left side. This made it easy to get on and off. To keep it closes, I used self attaching Velcro. I did not want to see the thread. I used the Velcro on 2 spots on the back as well, to keep it from slipping around.
The bottom of the front did not need to be attached. The belt would hold that part in place.
The main sewing part if done!


The armor is all made out of sheets of foam, the stuff you can buy at Michael’s Craft Store, and an amazing invention called Wonderflex. We will get to that in a minute.
I looked at all the armor pieces in the Satele picture. These should be thicker and non bendable. But I didn’t want to weigh 100lbs either. SD Comic Con is in the spring/summer time. I used different thicknesses of the foam and plain white glue to hold them together. Not all of the pieces I made are exactly like the picture because my body is not the same. So I could not get as many lines on the shins or straps around my arms. I focused more on the spacing and look, and not every line.
Make sure the gaps you leave between the pieces are larger than you think they need to be. This will be important when you work with the Wonderflex.

Wonderflex! The next best thing to the manaquin. This stuff is a thin piece of plastic that become very bendable (like fabric) as a fairly low temperature. It will mold around anything. Once it cools it is as hard as any other plastic. It can be reheated as many times as you need. Cuts with a knife or scissors. Can be sanded and painted.
One side of the sheet is a little more rough than the other. This is the sticky side. It helps adhere to whatever you put it on, especially itself.
Cut out 2 pieces of the Wonderflex to be slightly larger than you need for the foam pieces you have created. Heat it up using a heat gun. These look like hair dryers that you can find at a hardware store for under $20. Lay the foam piece on top of the Wonderflex and press down. Make sure you wear gloves! I have burnt my fingers a new times. Next warm up the other piece and put it on top. Work from the middle out to make sure you can bend it and get in all the gaps and shapes. Then press it down all around the edge. Not just to iteself, but also to the foam. This will take some time to get use to, since it takes a lot of reheating and messing with.
Once you are happy, set it aside and wait for it to cool. It takes maybe 5 minutes. Then use scissors to cit around as close as you can to the foam. It will leave a little edge around the foam piece. Again, warm up the Wonderflex and smooth out that piece. Makeing sure it is all pressed together and sealed around the foam. In the end, it will just look like a solid piece of plastic.
Now you can shape the piece. To do this, I made sure I had pant, or a shirt on that I didn’t mind would get a little messed up from the Wonderflex. I warmed up the piece, on both sides, and formed it around the body part it would be on. Using my hands to hold it there till it cooled.
The pieces now need to be primered, sanded a few times (to make as smooth and metal like as possible) and then painted. Regular primer and spray paint work great. Especially the metallic spray paints. Make sure to do this outside as it will get everywhere and smell.
Not all of the pieces are painted, some looked like the clothing. I used the extra pieces of fabric to cover these. Since Wonderflex can be sticky, I used that to my advantage. I warmed up the piece and stretched the fabric over it, getting it as tight as possible. Once it cooled, it helped to hold the fabric still. Then all of the edges were glued down with a hot glue gun. Again being held as tight as possible to the Wonderflex/foam piece.
To create pieces that needed to wrap around my arms, I used a larger piece of fabric to attach the armor to both sides, then pieces of Velcrow to attach to each other. This made it a LOT easier to get in and out of costume. I used the self adhesive Velcrow, but it did start to pull off after wearing it all day. I recommend Barges Glue. This has to be ordered on line. But is amazing.
As you can tell, my corgi Sir Doggington helps me on all my projects.
Shoes. No outfit is complete with out them. There are many tutorials on line on how to made boots. The fastest and most comfortable way, is to buy slip on shoes that you can easily walk in for hours.
Get that fabric back out and lay your leg out. With your foot at a 90 deg angle, as if you were standing. Now trace the outside of your leg and foot. Leaving LOTS of space. Cut this out and pin the front and back together, leaving the bottom of your toot and leg hold open. Put your show on and put this cover over it. Does it fit? I had to do this a few times, each time moving pins around to make it more form fitting to my leg and the show. You want it tight. Otherwise it will not say up on your leg. Especially for this outfit which goes above the knee.
After you are happy with all your pins, made sure to add a zipper. Otherwise how will you get your foot in and out. A longer zipper is best. I could have used 3 more inches to make it easier. Once the zipper is in and it is sewn, try it on again! Trust me, seams are easier to rip than taking clue off of shoes or starting over.
Now that it all fits, attach the bottom part of the fabric to the shoe. I used hot glue and did it all the way around the fabric part of the shoe, but left the black rubber part.
For the armor on top of the shoe, I used the trusted hot glue gun. The armor on my shins and knees were strapped on with fabric straps and safety pins. I know, safety pins are not the best, but I was running out of time!


Now for the final touches! You will need some braid in your hair, a lightsaber and some pouches (i got these at the army surplus store). Trust me, you need somewhere to carry your money and cell phone. Purses and backpacks just are not convenient for all the pictures that people will wont to take of you!

Myself, our nephew (Anakin Skywalker from Episode II), and my husband Willis (Darth Raven). All made by Willis and I.


